
Three Dimensional (3D) Viewing in Computer Graphics
What is Three-Dimensional Viewing?
- Three-dimensional (3D) viewing in computer graphics involves the representation and visualization of three-dimensional objects on a two-dimensional display.
- The process of 3D viewing encompasses various techniques such as projections to accurately portray the spatial relationships of objects in a virtual environment.
Representation of Three-Dimensional Objects
- In computer graphics, three-dimensional objects are typically represented using mathematical models.
- These models define the geometry, topology, and other properties of objects in a digital space.
- Common representations include wireframes, surface models, and solid models.
what is Projections?
- Projections are a crucial aspect of 3D viewing as they transform three-dimensional points onto a two-dimensional plane.
- Different projection methods are used to simulate how objects appear when viewed from a particular perspective or angle.
- The two main types of projections are parallel projections and perspective projections.
Parallel Projections
- Parallel projections maintain parallel lines in the scene, resulting in a realistic representation of object shapes.
- There are two primary types of parallel projections: orthographic projections and oblique projections.
Orthographic Projections
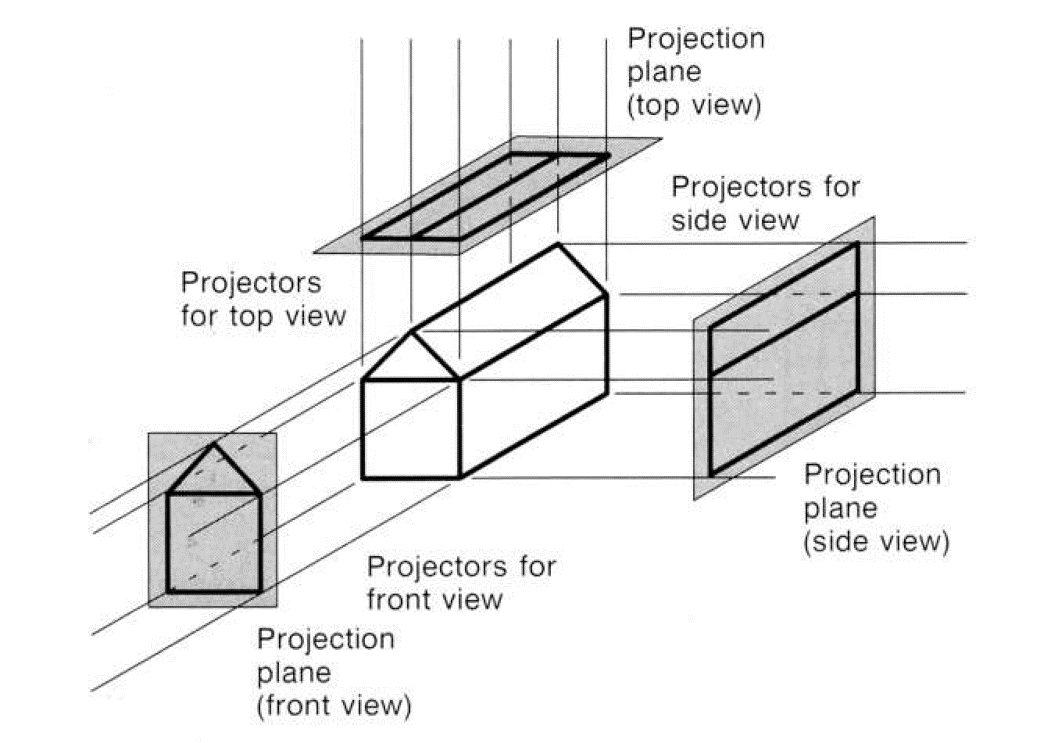
- Orthographic projections involve projecting 3D objects onto a 2D plane along parallel lines.
- This type of projection preserves the relative sizes of objects but eliminates depth cues.
- An example is the top, front, and side views often used in engineering and architectural drawings.
What is Foreshortening?
Foreshortening is a visual phenomenon in which objects or parts of objects appear shortened when viewed from a certain angle.
Characteristics of Orthographic Projections:
- No Foreshortening: Orthographic projections do not introduce any foreshortening.
- The lengths of objects along each axis remain unchanged in the projection.
- Lacks Realistic Depth Cues: While orthographic projections provide accurate dimensions, they lack realistic depth cues.
- Simplicity and Clarity: Orthographic projections are known for their simplicity and clarity.
Axonometric Orthographic Projection
- In axonometric Orthographic projection, the object is projected onto the plane without any foreshortening along any axis.
- This means that all three axes of the object are equally foreshortened, resulting in a realistic and proportional representation.
- There are two primary subtypes:
- Isometric Projection: In isometric projection, the angles between the three axes are equal, resulting in a visually balanced representation.
- This projection is often used in technical and engineering drawings.
- Dimetric and Trimetric Projections: These are variations of axonometric projection where the angles between the three axes are not equal.
- Dimetric has two unequal angles, and trimetric has all three angles unequal, allowing for a more customizable representation of objects.
Oblique Projections
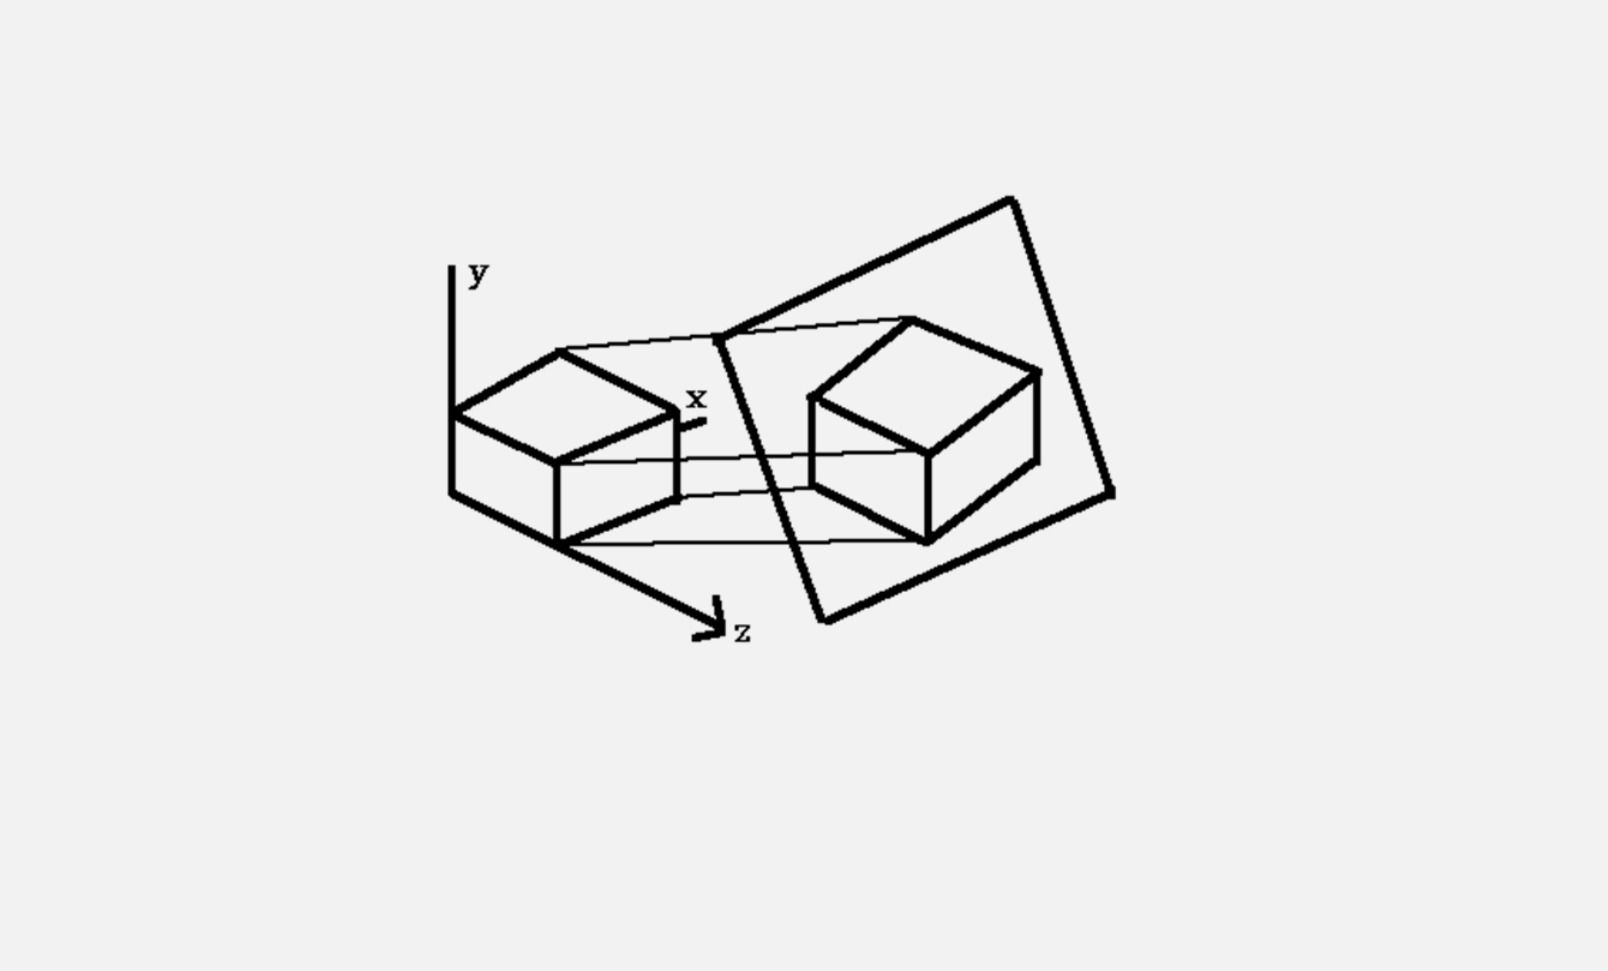
- Oblique projections introduce a level of skewness to the projection, providing a more natural representation of depth.
- These projections are often used when a more visually appealing representation is desired.
- One common example is the cavalier projection, which maintains one axis as true scale while skewing the other two.
Characteristics of Oblique Projections
- Foreshortening Along One Axis: Oblique projections involve foreshortening along one of the coordinate axes while maintaining the true scale along the other two axes.
- Unlike orthographic projections, oblique projections use projection lines that are not parallel to the coordinate axes.
- Types of Oblique Projections: There are different types of oblique projections, including cavalier and cabinet projections.
- Realism: Oblique projections offer an intermediate level of realism compared to orthographic and perspective projections
Cavalier Oblique Projection
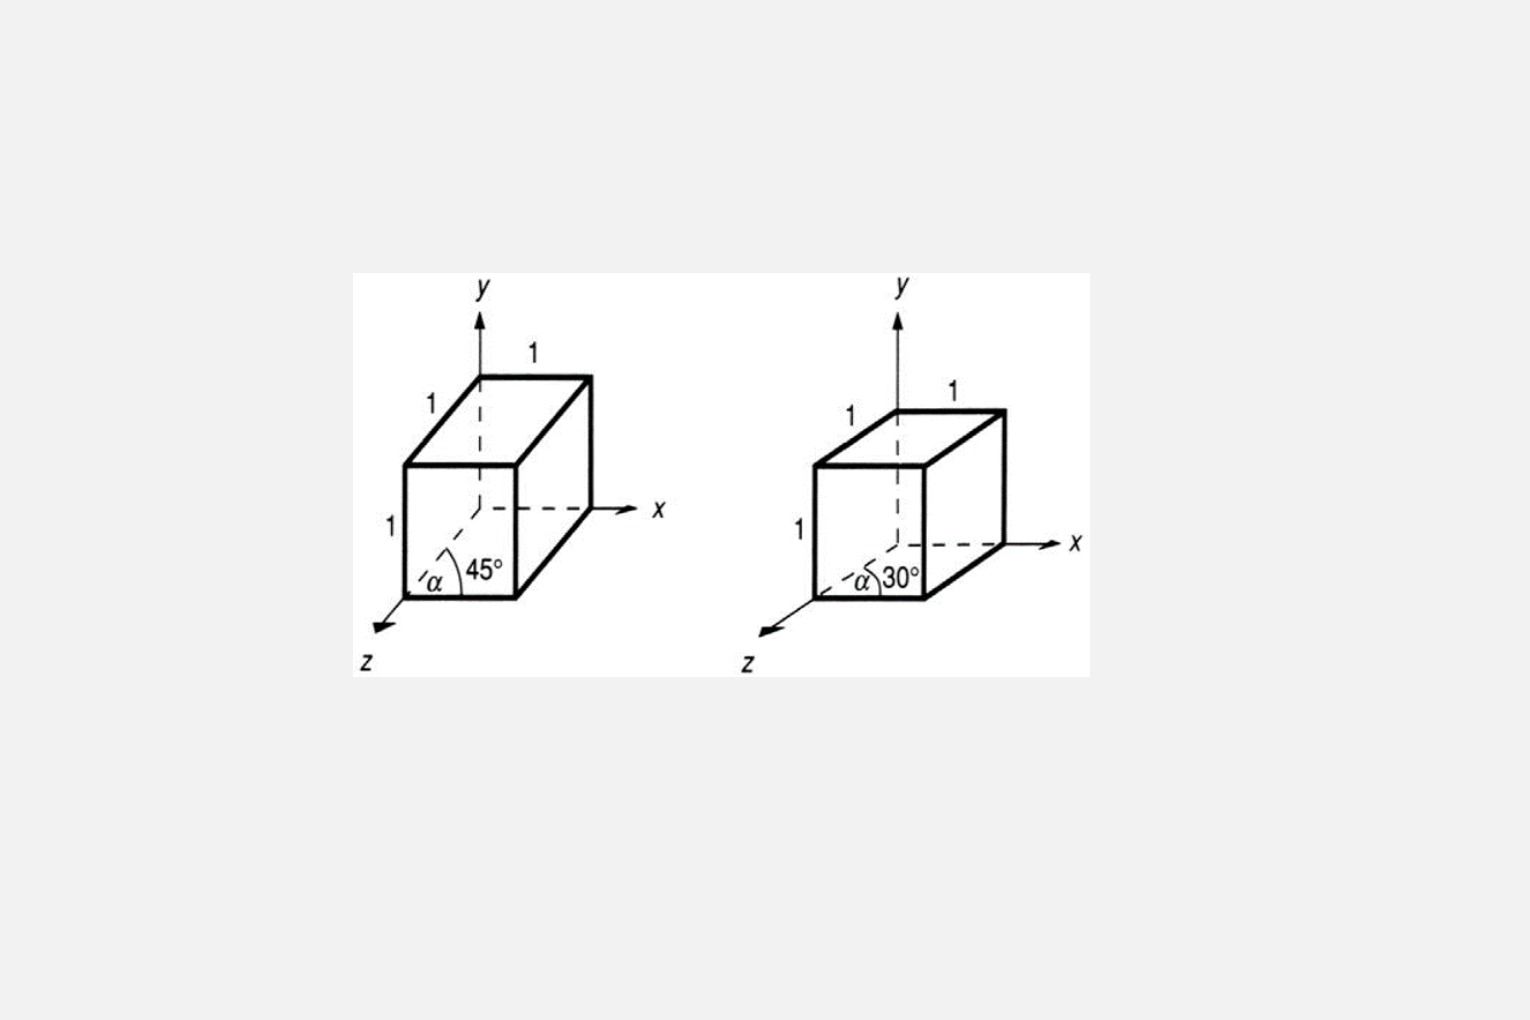
- Cavalier projection is a type of oblique projection where the object is projected onto the 2D plane without any foreshortening along any axis.
- In other words, the length along each axis remains the same in the projection, providing a simple and direct representation.
Characteristics of Cavalier Oblique Projection:
- No Foreshortening: In Cavalier Oblique Projection, there is no reduction in the length of objects along any axis.
- Equal Scaling: Each axis is equally scaled in the projection, preserving the proportions of the original object.
- Simplicity: Cavalier projection is characterized by its simplicity, making it easy to visualize and understand.
- Limited Realism: While Cavalier Oblique Projection provides a sense of depth, it lacks the degree of realism as compared to perspective projection.
Cabinet Oblique Projection
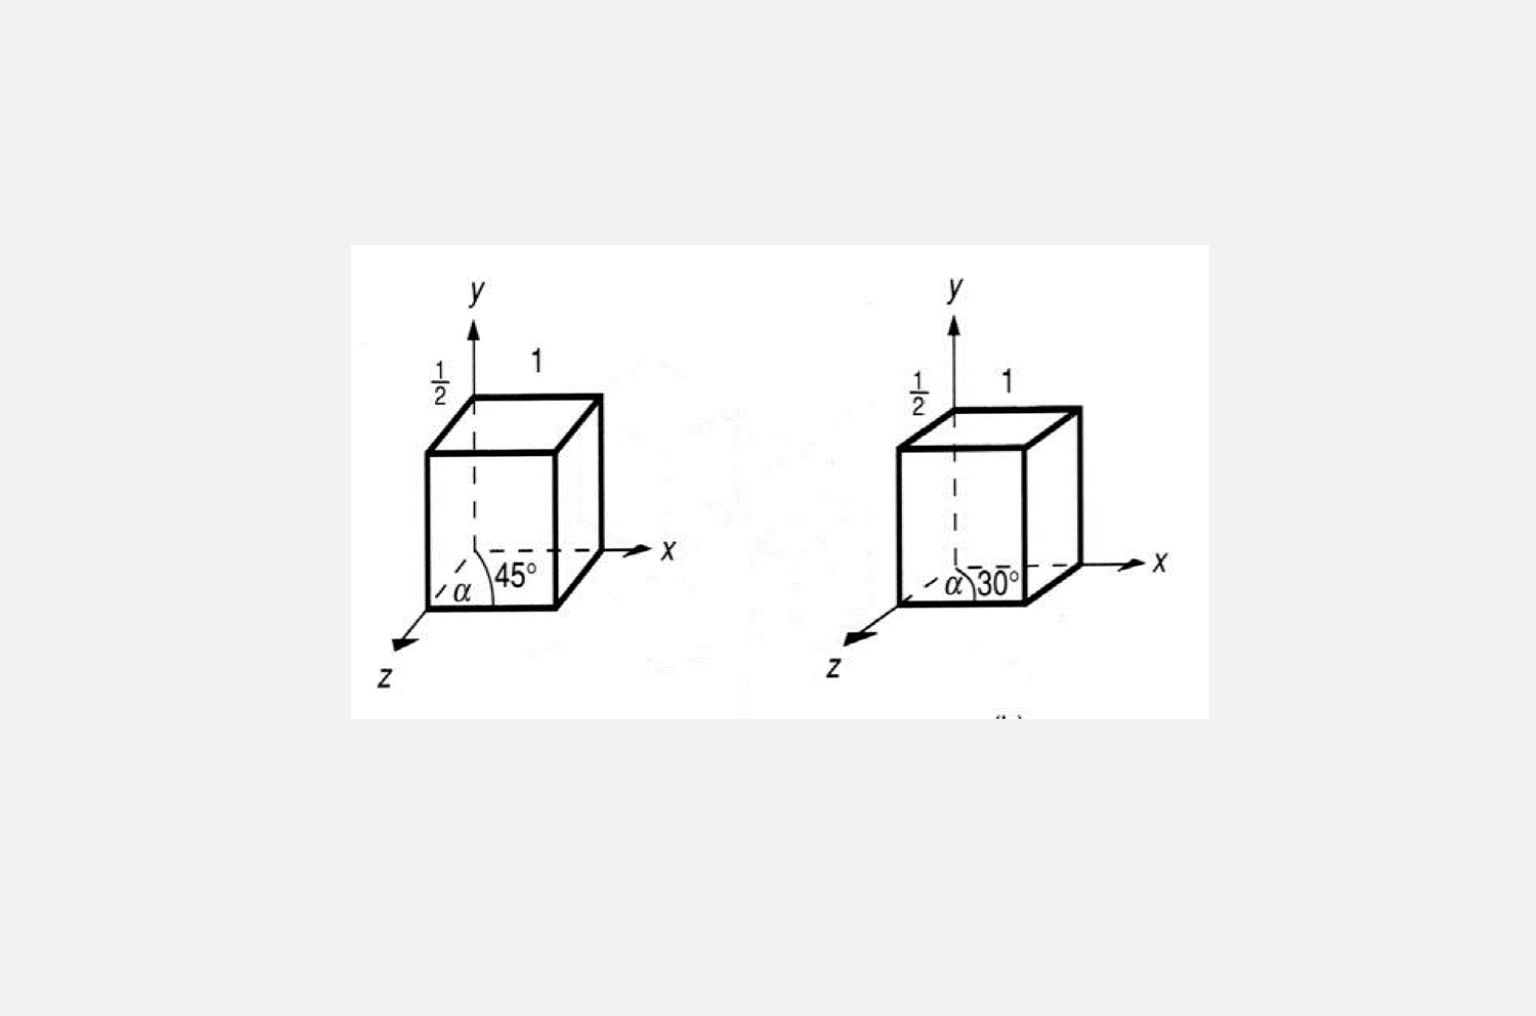
- Cabinet projection combines the simplicity of orthographic projection with a slight degree of foreshortening along one axis.
- In cabinet projection, one axis is foreshortened by half its actual length, while the other two axes remain at their true scale.
- This creates a visually appealing representation that strikes a balance between realism and simplicity.
Key Characteristics of Cabinet Projection
- Partial Foreshortening: Unlike cavalier projection, cabinet projection introduces a degree of foreshortening along one axis, typically reduced to half its actual length.
- Equal Scaling on Two Axes: The other two axes maintain their true scale without foreshortening, preserving the proportions of the object.
Perspective Projection
- Unlike parallel projections, perspective projections simulate how objects appear in the real world by converging lines toward a vanishing point.
- This creates the illusion of depth and is crucial for creating realistic scenes.
Characteristics of Perspective Projection
- Size Diminution: Objects that are farther away from the viewer in perspective projection appear smaller in size.
- Application in Art and Design: Perspective projection is widely used in art, architecture, and design to create realistic and visually compelling representations.
- Three-Dimensional Illusion: Perspective projection is effective in creating a convincing illusion of three-dimensional space on a flat surface.
What is the Vanishing point?
- In perspective projection, the vanishing point refers to a point on the horizon line where parallel lines appear to converge or meet in the distance.
- A vanishing point occurs due to the way our eyes perceive objects in the three-dimensional space.
- In a perspective view, parallel lines that extend away from the viewer converge towards one or more vanishing points.
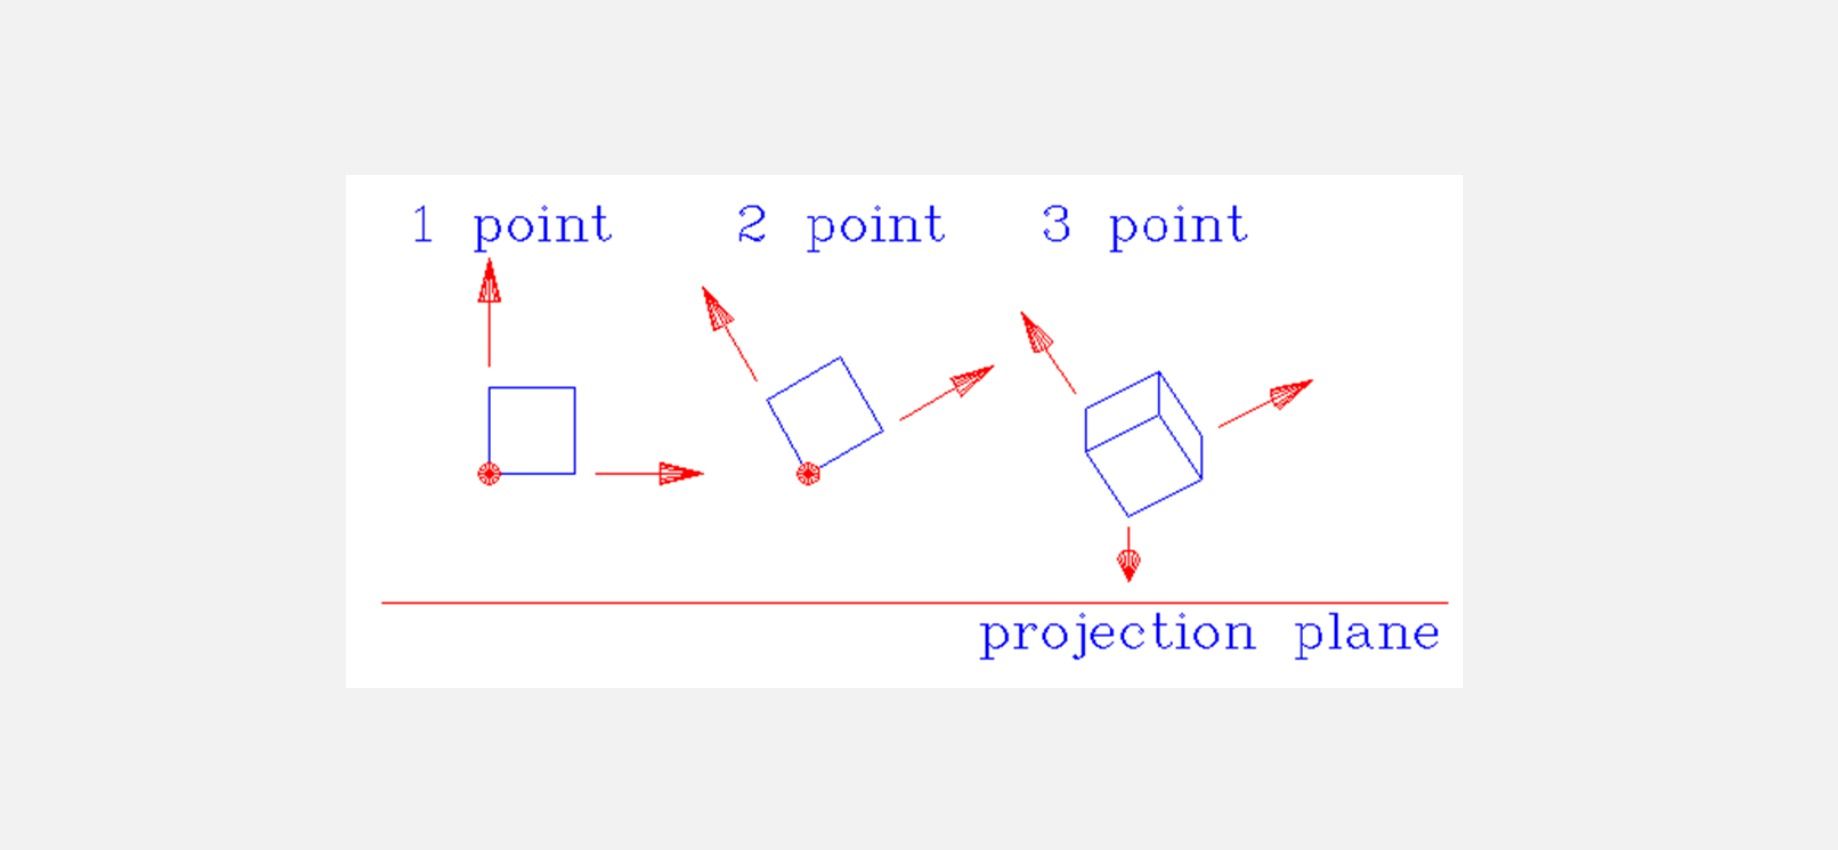
Classes of Perspective Projection
- one-point Perspective
- Two-point Perspective
- Three-point Perspective
- Multi-point Perspective
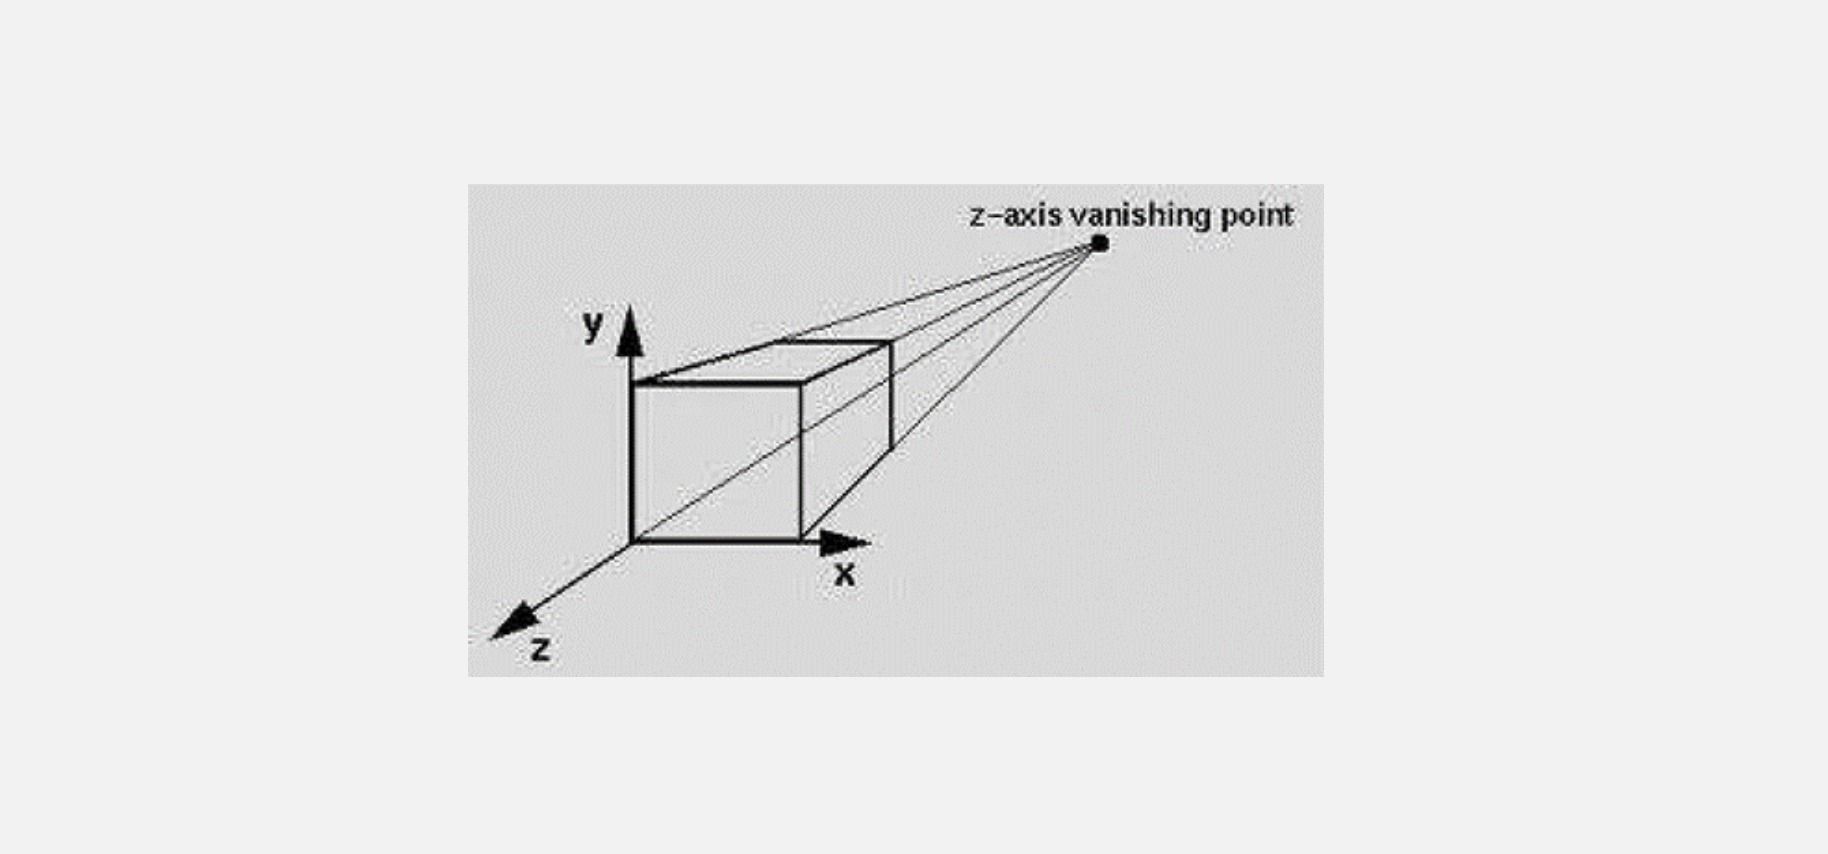
One-Point Perspective:
- In the one-point perspective, also known as the frontal or parallel perspective, there is a single vanishing point on the horizon line.
- This occurs when the object is positioned such that one set of parallel lines is directly facing the viewer.
- One-point perspective is commonly used when a road stretches into the distance.
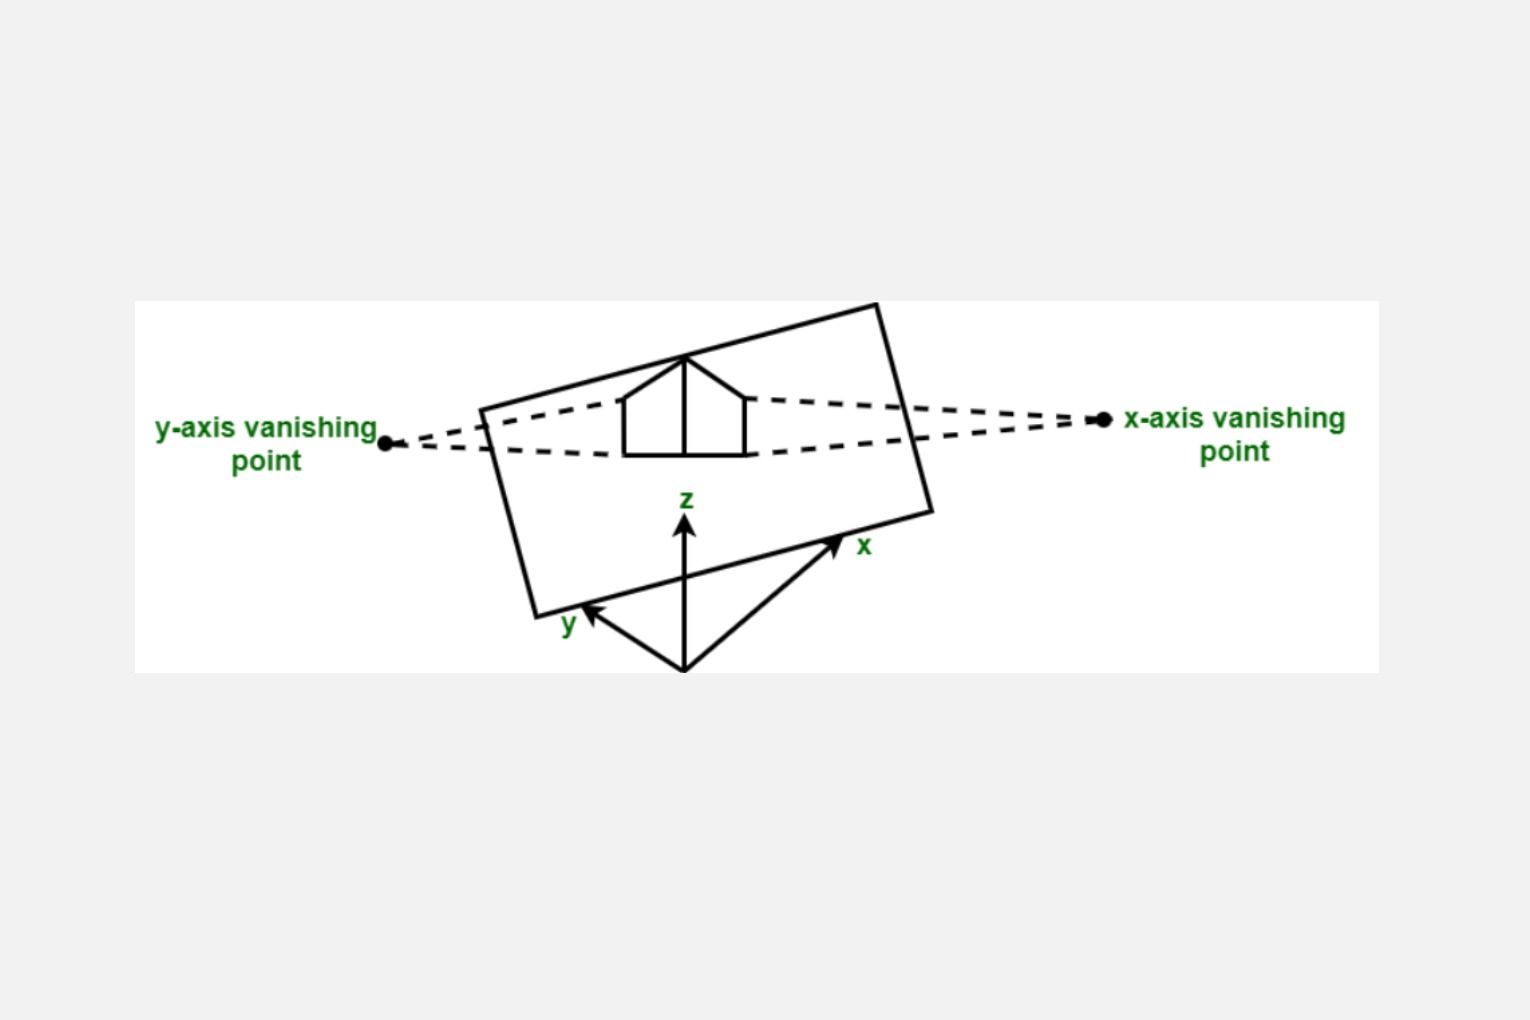
Two-Point Perspective
- Two-point perspective involves two vanishing points on the horizon line.
- This occurs when the object or scene is oriented in such a way that two sets of parallel lines are not directly facing the viewer.
- Two-point perspective is frequently used when drawing objects like buildings or interiors where two sides are visible and have distinct sets of parallel lines.
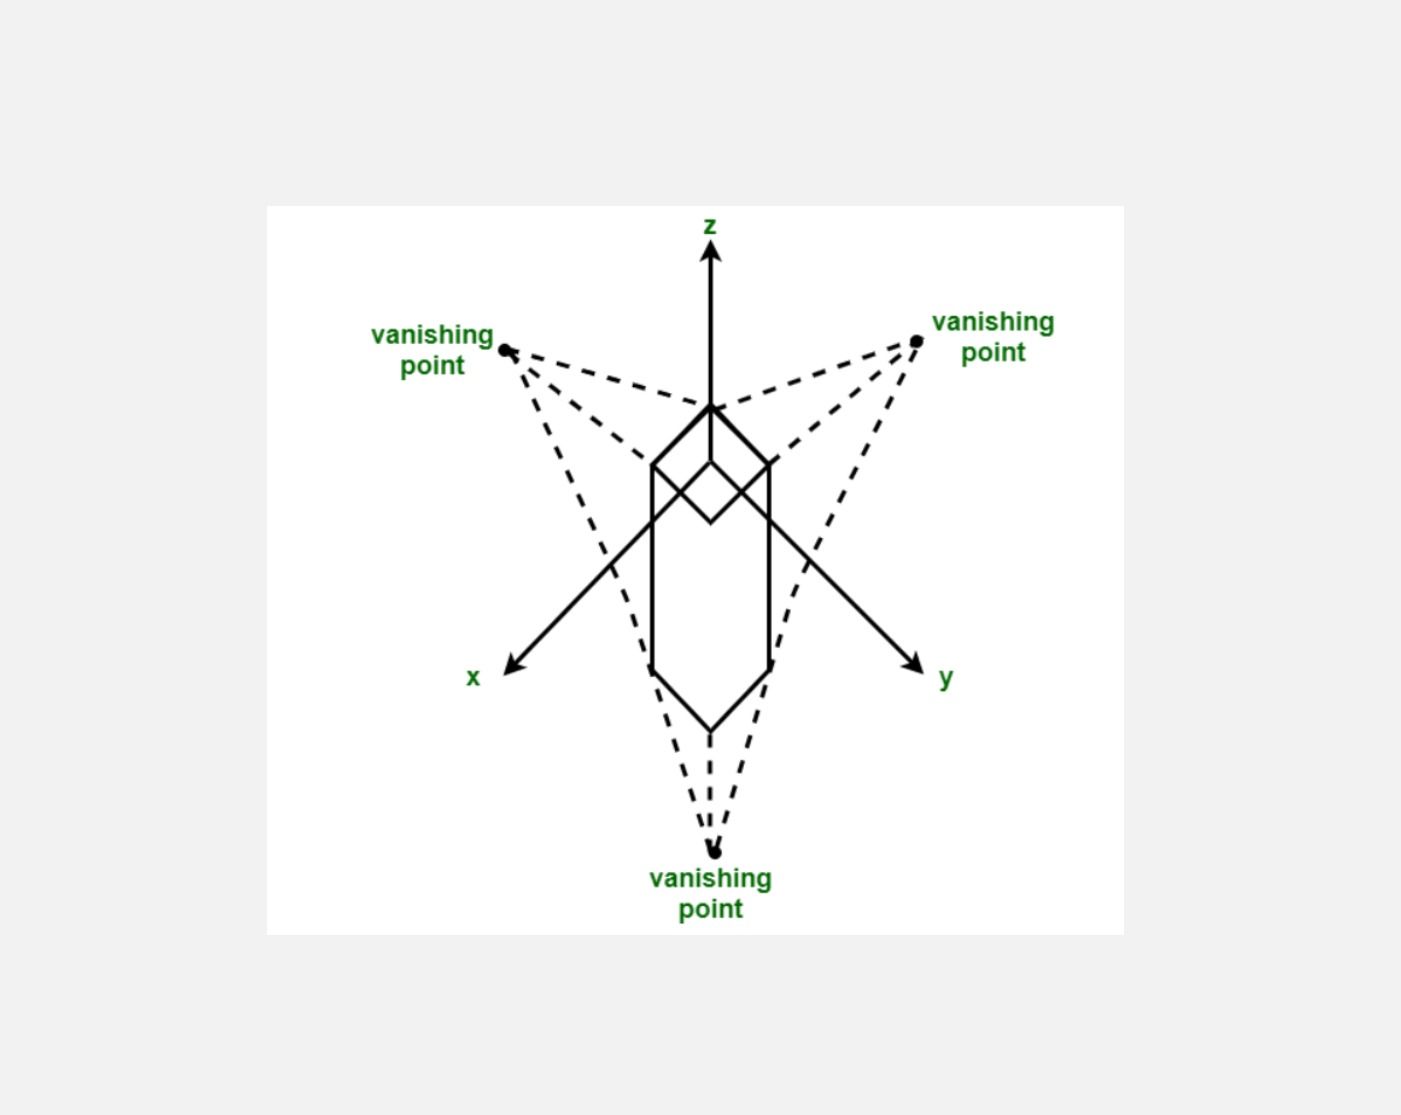
Three-Point Perspective
- Three-point perspective introduces a third vanishing point, typically above or below the horizon line.
- This occurs when the object is tilted or when the viewer is looking up or down at the scene.
- Three-point perspective is often used in drawings of tall buildings.
Multi-Point or Panoramic Perspective
- Multi-point perspective involves more than three vanishing points, accommodating complex scenes or objects with various orientations.
- This type of perspective may be used in panoramic drawings or illustrations where multiple vanishing points are required.
Perspective vs. Parallel Projection
Perspective Projection
- Convergence of Lines: As objects move farther from the viewer, they appear smaller, creating a sense of depth.
- Depth Perception: Provides a realistic representation of depth, making objects appear more natural and lifelike.
- More complex, involves vanishing points.
- This is crucial for applications where visual realism is essential, such as 3D rendering for movies or video games.
- Classes of perspective projections are one-point,two-point and three point.
- Application in Art and Design: Widely used in artistic and architectural contexts where a realistic portrayal of space is crucial.
- Example: Imagine standing on a road and looking into the distance.
Parallel Projection
- Maintains Parallel Lines: In parallel projection, lines remain parallel in the projection, preserving the relative sizes of objects without converging toward a common point.
- This results in a more schematic and simplified representation.
- Lack of Depth Cues: Parallel projection does not provide inherent depth cues.
- Objects maintain the same size regardless of their distance from the viewer.
- Orthographic and Oblique Projections: Orthographic and oblique projections are common types of parallel projections.
- Frequently used in technical drawings and engineering designs where an accurate representation of object dimensions is crucial.
- Example: Consider an architectural floor plan where walls, doors, and windows are represented with parallel lines.
Conclusion
- 3D viewing involves the representation of objects in three-dimensional space and their projection onto a two-dimensional plane.
- Two types of projections parallel and perspective: parallel includes orthographic and oblique. while perspective includes classes such as one-point, two-point, and three-point.