How to deploy weaviate to google cloud using Kubernetes
Weaviate is a powerful vector database designed for AI applications. When deploying it in production, security is paramount. This guide covers:
Initial deployment of Weaviate on Kubernetes
Setting up API key authentication
Implementing HTTPS/TLS encryption with Let's Encrypt
Configuring Ingress for proper routing
Prerequisites
- A running Kubernetes cluster (GKE in this example)
- google cloud account with credits
- kubectl command-line tool configured
- A domain name with DNS access (we used sehajbindra.info)
Step : 1 Setup
Go to the google cloud marketplace and search for weaviate.
- After purchasing we need to configure the Installation Instructions
- To deploy Weaviate, follow these steps:
- Navigate to Weaviate's Google Cloud Marketplace listing page and click Configure.
- Follow the on-screen instructions to configure and deploy Weaviate.
Configuration Options
Before starting the deployment, consider the following configuration options:
Suggested Configurations
- Default values for settings like Global Query Limit, Modules, and Storage Size are generally suitable for most use cases.
- For production environments, a minimum of 500GB storage per pod is recommended, while smaller disks may suffice for development environments.
- Once on the deployment page, you will encounter several options:
- Select a GKE cluster for Weaviate deployment. You can create a new cluster if needed.
- Specify the namespace for resource division and a unique app instance name for identification.
- Set the service account for billing purposes.
- Configure Weaviate parameters, including Replicas of Weaviate Instances, Global Query Limit, Enable Modules, and Storage Size.
- Accept the terms of service and click Deploy.
- After completing these steps, Weaviate will be deployed to your selected cluster, which may take a few minutes.Verifying the Initial Weaviate Deployment.
Verifying the Initial Weaviate Deployment
First, let's check if Weaviate is properly deployed:
Loading…
You should see Weaviate services running with external IPs:
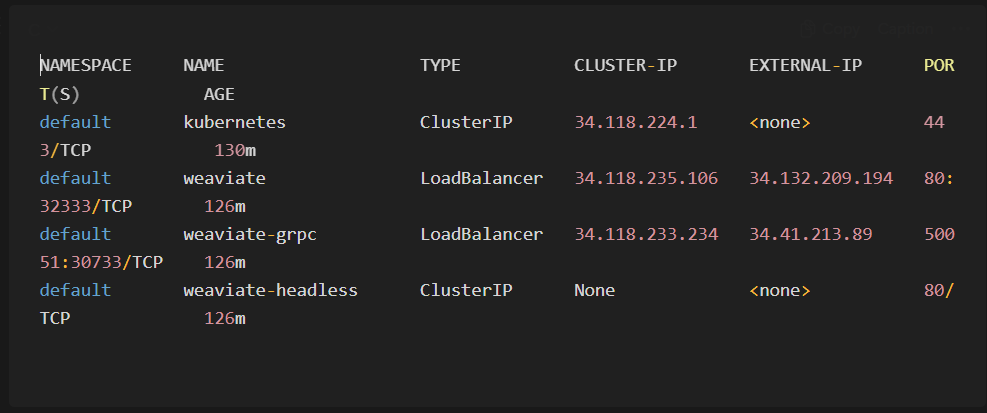
Note: if you are not getting the weaviate services here it means weaviate is not deployed at first place. For more info read this.
Step: 2 Setting Up Authentication for Weaviate on Kubernetes
Weaviate supports several authentication methods, but API key authentication is one of the simplest to implement. It allows you to secure your Weaviate instance with minimal configuration while providing a straightforward way for applications to authenticate.
Prerequisites
Before starting, ensure you have:
- A running Kubernetes cluster
- Weaviate installed on the cluster
- kubectl configured to access your cluster
- Admin access to modify Kubernetes resources
(A) Generate a Secure API Key
First, generate a secure random API key. You can use OpenSSL for this:
Loading…
This will output a secure random string like:
Loading…
Save this key securely as you'll need it for authentication.
(B) Configure Authentication in Weaviate
To enable API key authentication in Weaviate, we need to add environment variables to the Weaviate StatefulSet.
Create a Kubernetes Secret for the API key
Loading…
(C) Update your Weaviate configuration
Loading…
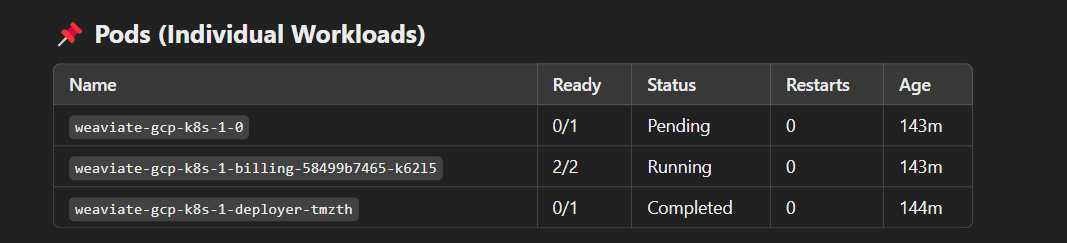
Good to know: A StatefulSet is a Kubernetes workload API object used to manage stateful applications that require stable network identities, persistent storage, and ordered deployment.
1️⃣ Stable Network Identity: Each pod gets a unique, predictable name (pod-0, pod-1, pod-2).
2️⃣ Persistent Storage: Each pod gets its own Persistent Volume (PV), which is not shared with other pods.
You will get output of the pods:
Then update the StatefulSet with your configuration:
Loading…
Replace the authentication environment variables with:
Then, in the editor, add these environment variables in the env: section under the container definition (place them with the other env vars):
When editing a Kubernetes resource with the kubectl edit command, you'll be placed in a text editor (usually Vim or Nano, depending on your system's default editor). Here's how to edit the file in the editor:
When editing a Kubernetes resource with the kubectl edit command, you'll be placed in a text editor (usually Vim or Nano, depending on your system's default editor). Here's how to edit the file in the editor:
If you're using Vim (most common default)
- When the file opens, you'll be in "command mode"
- Press i to enter "insert mode" where you can make changes
- Use arrow keys to navigate to the right position (where the other env variables end)
- Add your new environment variables with proper indentation
- When finished, press Esc to exit insert mode
- Type :wq and press Enter to save and quit
If you're using Nano
- Use arrow keys to navigate to where you want to add the environment variables
- Type or paste the new environment variables
- Press Ctrl+O then Enter to save
- Press Ctrl+X to exit
Loading…
(D) Apply the Changes
After editing the StatefulSet, Kubernetes will automatically update the pods with the new configuration. You can get the pods:
Loading…
If you see pods in an error state, check the logs
Loading…
(E) Verify Authentication is Working
Once your Weaviate pods are running, test the authentication:
Try accessing Weaviate without authentication (should fail)
Loading…
Try accessing Weaviate with authentication (should succeed)
Loading…
Authorization Fails Despite Correct Configuration
If authentication is configured but API requests still fail:
- Double-check the API key for typos or whitespace
- Ensure the Authorization header is formatted correctly: Bearer <api-key>
- Check if the Weaviate service is properly exposing port 80
Step 3: Implementing HTTPS/TLS with Let's Encrypt
(A) Install NGINX Ingress Controller
TLS Architecture Overview
For production deployments, a proper TLS setup includes:
- Ingress Controller: Handles traffic routing and TLS termination
- Certificate Manager: Automates certificate provisioning and renewal
- TLS Certificates: Secures all communications
Loading…
Verify deployment:
Loading…

Check the service to get the external IP:
Loading…

(B) Install cert-manager
cert-manager handles certificate issuance and renewal automatically:
Loading…
Verify installation:
Loading…

(C) Domain Configuration
- For production environments, proper DNS configuration is critical:
- Register a domain name (e.g., sehajbindra.info)
- Configure an A record pointing to your Ingress Controller's IP:
Loading…
(D) Create a Let's Encrypt ClusterIssuer
Loading…
Make sure to replace your-email@example.com with your actual email address before running the command.
(E) Create an Ingress Resource
Loading…
Now, let's check the status of the Ingress resource and the certificate:
Loading…
kubectl get ingress weaviate-ingress:
Loading…
If the certificate shows as ready:
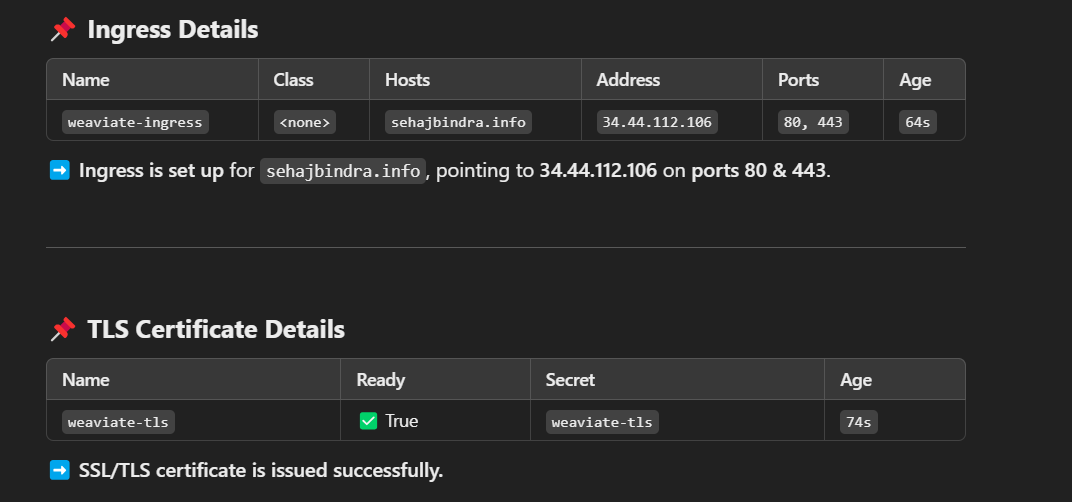
Congratulations! Your Weaviate instance is now accessible securely:
Loading…
Conclusion
- You now have a production-ready Weaviate installation with:
- API key authentication for secure access control
- HTTPS/TLS encryption with valid certificates from Let's Encrypt
- Proper Kubernetes resource configuration
- This setup provides a secure foundation for using Weaviate as a vector database in AI applications, ensuring that both your data and communications are protected.