Database Integration in an Express JS App using MongoDB
`Hey there fellow coders!! I am excited for today's blog! Are you? I hope you are, because today, we go a step further in our journey of express development and talk about how can we add a database to our express application!
The Need for a Database?
Before we talk about how can we add a database to our application, let's first discuss why do we even need it in the first place?
Say you created an application that stores super important user data. Where do you store it?
Let's say, you thought about saving the data in browser storage, commonly called localStorage, but what if we you have a lot of data that cannot be stored in the limited localStorage?
Well, that's why databases exist. These are independent storage units which can store large amounts of data. As for the advantages there are many:
- A database allows us to store our data in a structured manner that makes data handling and manipulation easier.
- We can enforce some characteristic rules to ensure integrity.
- These are more secure as they don't exist on the client-side, but the server side.
- Since the data is not directly linked, the use of databases allows us to independently develop and maintain our application without having to worry about losing any data.
MongoDB: The Database on Cloud
- For our series of articles, we will be talking about MongoDB, it's not the only database solution nor it is the best one, but it's easy to learn and grasp.
- When we climb our ladder we will switch up for more complex and robust databases.
- Too much theory, eh...? Let's build something, shall we :)
Getting the Credentials
- Head over to MongoDB.com and create an account or sign in and follow the steps to create a free cluster:
- After logging in, you will need to create a Project for your cluster to live in. You can name it anything you want and leave the Tags section for now.
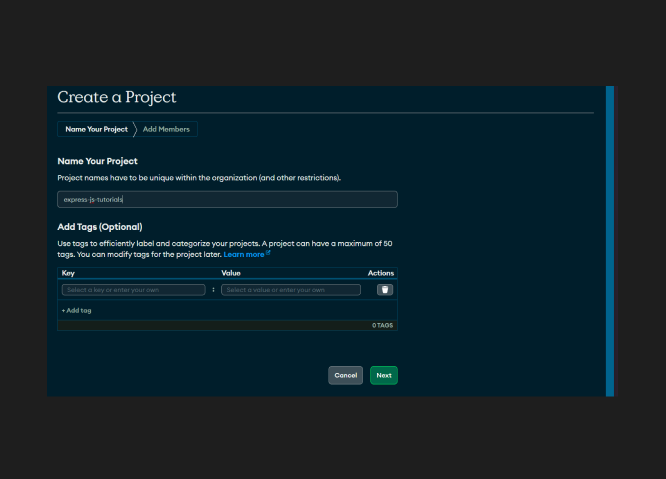
- Next, on the members overview page, we don't need to change anything, since we will be the only member using/editing the database, so you can click "Create Project" and proceed.
NOTE: If you are working on a bigger project, it will be better if you have different users with different permissions as per their role!
- Once the project is created, you will be redirect to the "Project Overview" page where you will see a "Create" button, clicking on it will take us to the "Create a Cluster" Page.
- All we need to do here, is to make sure that we have selected the "M0" variant because it's free.
- Rest of the options are configured automatically for the best performance.
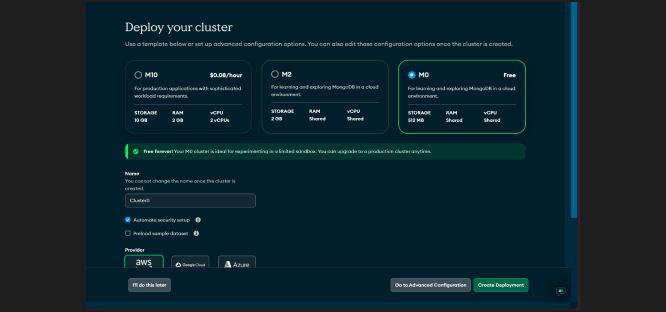
- Click on "Create Deployment" to finish up the process. It will take up to 2 minutes to setup your new cluster.
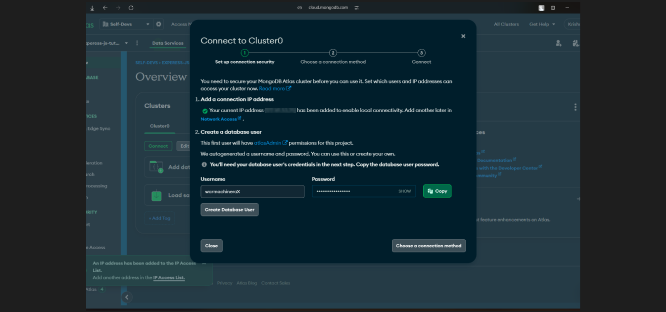
- On the next window, you'll be prompted to proceed with some "interaction methods", like the users of the databases and how would you like to connect to the database from your app.
IMPORTANT: The user(s) we define here, are different from what we defined earlier.
The user(s) defined while creating the project were top-level users, like DB Owner or Editor with permissions of their own.
The users we define here(in the cluster setup) are the ONLY users who will be able to read/write to the database.
- It will automatically suggest a user for you based on your account user name and a strong password,
- but you can change both of them to whatever you like, just make sure you remember them.
- Once you're happy with the credentials, you can click on "Add Database User" to add the user to the access list and then we can click on "Choose Connection Method" to proceed.
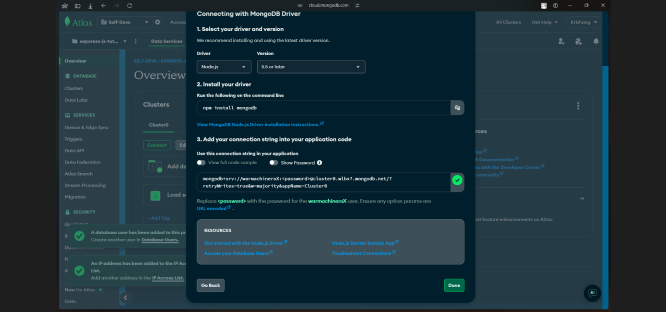
- On the "Connection Methods" we need to select the "Drivers" option since we will be connecting mongoDB drivers for NodeJS.
- On the next screen, you'll see some instructions to install the required drivers, we can skip that part for now and scroll down to where we have our "Connection String" and copy it.
Setup
Our work on the website is now done, and we can now start the fun part by creating a basic express app. We will install 2 other packages this time
- mongoose: for database interaction.
- nodemon: to restart our server when we save our changes.
- dotenv: to make use of environment variables for our mongoDB credentials.
1// All packages
2npm install express mongoose dotenv
3
4// Insta nodemon as dev dependency
5npm install --save-dev nodemon
Now if you have worked with nodemon before, you will know that there is a slight change we need to make in out package.json file..
1{
2...
3  "main": "server.js", // You can name the file anything
4  "scripts": {
5    "dev": "nodemon server.js"
6  },
7  ...
8  "dependencies": {
9    "dotenv": "^16.4.5",
10    "express": "^4.19.2",
11    "mongoose": "^8.5.3"
12  },
13  "devDependencies": {
14    "nodemon": "^3.1.4"
15  }
16}
17
Server.js
Paste the following contents into the entry point of your file (server.js in my case).
1// Import required packages
2const express = require("express");
3const mongoose = require("mongoose");
4// Enable the use of environment variables
5const dotenv = require("dotenv").config();
6
7// Initialize an express app
8const app = express();
9
10// Define a port for the server to listen
11const port = process.env.port || 3000;
12
13// Start the server and connect to database
14app.listen(port, () => {
15  try {
16    mongoose
17      .connect(process.env.MONGO_URI)
18      .then(() => console.log("Database Connected!"))
19      .catch((error) =>
20        console.error("Error connecting to the database: ", error)
21      );
22    console.log("Server Initialized");
23  } catch (error) {
24    console.error("Error initializing the server: ", error);
25  }
26});
27
In the code above, we have imported the required dependencies. Initialized an express app, and
started it on PORT:3000 and in our try...catch block we have tried to establish a connection to our mongoDB cluster and handled any possible errors.
As for our environment variables, we have created a .env file, it will help us keep our API keys and credentials off the screen.
Your .env file should contain 2 variables for now:
- Mongo Database URI: This is the connection string we copied when we were initializing out cluster.
- PORT Number: This is optional for now, which means, you can directly hard code the value in the server.js file if you want to.
IMPORTANT: Do note that to use these variables in your code, you need to prefix the name of the variables with "process.env.<VARIABLE_NAME>".
Also restart your server entirely when you make changes to any environment variable(s).
Also replace the "<password>" in your connection string to the actual password you created when defining the cluster.
Open up a new terminal in VS Code( Ctrl+`) and run the command:
1nodemon server.jsThis should start our server, and we should be able to see 2 messages:
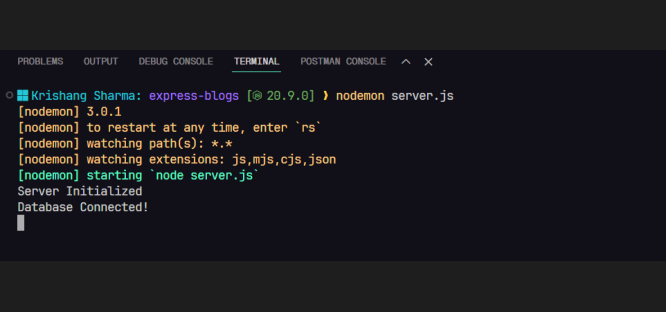
- With this, we have successfully connected our working express application to our NoSQL Database(MongoDB).
- In our next blog, we learn about some best practices and code separation in an express application.
- We will be building a complete API with CRUD operations using MongoDB as our database.
- Stay tuned for more! And I'll, catch you in the next one!👋